Are you struggling to capture the perfect shot of your client’s or model’s stunning short hairstyle? Capturing high-quality photos of short hair can be challenging, but with the right techniques and expertise, it’s definitely achievable. Whether you’re a professional photographer, stylist, or just someone who loves taking great photos, mastering the art of shooting short hair is an essential skill to have.
In this article, we’ll dive into expert tips and techniques on capturing stunning short hair photos, from choosing the perfect model to post-processing perfection. We’ll cover everything from lighting and composition to styling and editing, so you can elevate your photography game and create breathtaking images that truly showcase the beauty of short hairstyles.
Understanding the Power of Short Hair Photography
Short hair photography has become increasingly popular, and it’s easy to see why: clean lines, minimalist styles, and a focus on texture make for truly captivating images. Let’s break down what makes short hair photos so powerful.
Embracing the Beauty of Short Hairstyles
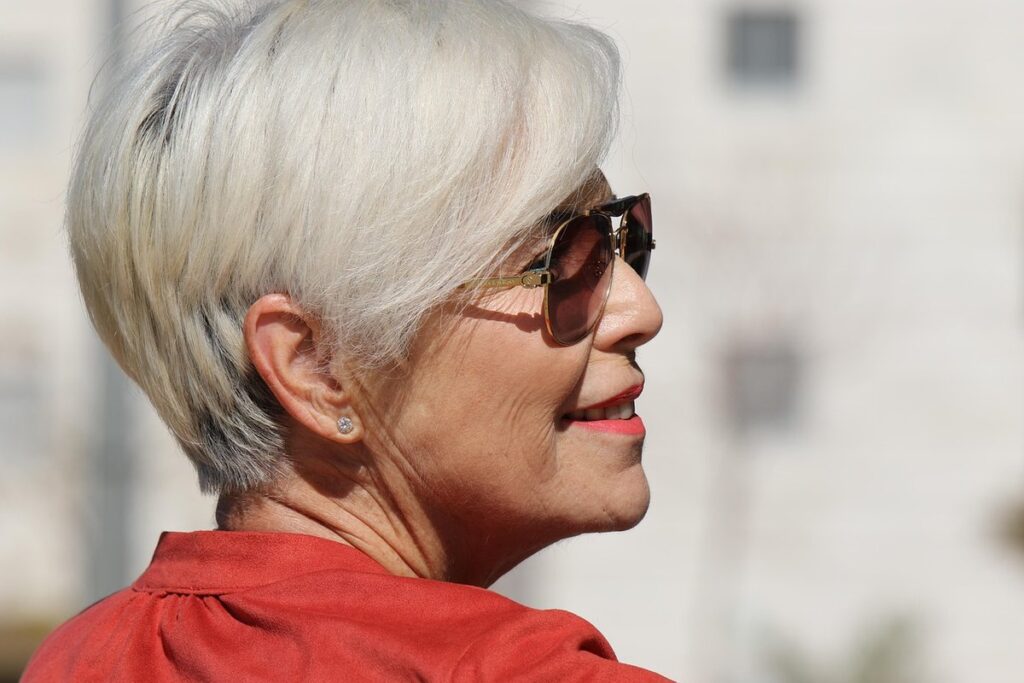
Short hair is often misunderstood as being restrictive in terms of styling options. However, nothing could be further from the truth. When captured through photography, short hair reveals a multitude of possibilities for showcasing its versatility.
One key aspect to consider when photographing short hair is accentuating facial features. A skilled photographer will focus on capturing angles that highlight the subject’s best features, often using natural light or clever posing techniques. This can be seen in the works of photographer, Peter Lindbergh, who consistently highlights the elegance and sophistication of his subjects’ faces through minimalist approaches to styling and lighting.
Short hair can also add a level of edginess and modernity to an image. By incorporating striking poses or unconventional settings, photographers can create visually stunning images that not only capture the essence of short hair but also convey the subject’s personality. Ultimately, embracing the beauty of short hairstyles in photography involves experimenting with different styles, angles, and techniques to unlock its full potential.
Tips for Choosing the Right Model and Setting
When it comes to capturing stunning short hair photos, choosing the right model and setting is crucial. You want someone whose texture and style complements their look, making them a perfect fit for your shoot.
Consider a model with hair that’s similar to the type you’re trying to showcase. For example, if you’re shooting a sleek and straight look, choose a model with fine or thin hair that will sit flat against their head. If you’re going for a textured, piecey vibe, select someone with thicker, wavier hair that will hold onto the style.
In terms of setting, opt for a location or backdrop that enhances your model’s features without overpowering them. A minimalist approach often works best – think neutral-colored walls, a plain window, or even an empty studio space. Avoid cluttered or busy backgrounds that might distract from the star of the show: their hair.
Lighting Techniques for Flattering Short Hair
When working with short hair photography, lighting can make or break the overall look and feel of the image. To flatter short hair, you’ll want to use techniques that create depth, texture, and a sense of dimensionality.
Using natural light is an excellent way to enhance short hair. Soft, diffused light can help create a subtle, effortless look that complements the style’s simplicity. When shooting outside, try capturing your subject in the golden hour – the period just before sunset when the light is soft and warm. This will add depth and dimension to their features while also highlighting the texture of their short hair.
Artificial light, on the other hand, offers more control over the lighting effect. Consider using a combination of softbox lights or umbrella lights to create a soft, even glow that emphasizes the shape and structure of the hair. When working with artificial light, experiment with different angles and positions to find the most flattering look for your subject’s short hair.
Mixed lighting techniques can also be effective in creating visually appealing images of short hair. For example, you could use natural light as the main source and supplement it with artificial light to add depth or highlight specific features. The key is to experiment and find what works best for your subject’s unique style and look.
Popular Short Hairstyles That Look Great on Camera
If you’re looking for a haircut that turns heads, you’ll love these stylish and camera-friendly short hairstyles that will make your locks shine. From edgy to elegant, we’ve got them all!
Pixie Cuts: The Ultimate Low-Maintenance Style
Pixie cuts have been a staple in fashion for decades, originating in the 1920s with Louise Brooks’ iconic look. This style has seen its fair share of iterations over the years, from Audrey Hepburn’s gamine charm to Michelle Williams’ more angular take.
One of the most popular variations is the “Undercut Pixie,” where the hair on the sides and back is buzzed close to the head, while the top layer remains longer. This look creates a striking contrast between texture and length.
For those looking to style their pixie cut in front of the camera, it’s essential to focus on enhancing its natural texture. Use a texturizing spray or dry shampoo to add volume and grit, then rough-dry your hair to create a piecey, undone look. Avoid over-grooming, as this can make the style appear too polished for photography.
To capture the essence of your pixie cut in photos, experiment with angles that highlight its unique features – think low-angle shots that emphasize the contrast between texture and length. By embracing the cut’s natural asymmetry and playing up its edgy charm, you’ll be sure to steal the spotlight.
Bobbed Hair: A Classic Look That Never Goes Out of Style
The bob has been a timeless classic for decades, and its enduring popularity can be attributed to its versatility and ease of styling. One of the reasons why bobs are great on camera is that they frame the face perfectly, accentuating the features without distracting from them.
There are several types of bobs, including the blunt cut, asymmetrical bob, and long bob (also known as a “lob”). The blunt cut creates a clean, straight silhouette around the jawline, while the asymmetrical bob adds a touch of edginess to the classic look. For those who want a more dramatic effect, the lob is a great option – it can add length to the face while still maintaining a stylish, short-hair vibe.
Celebrities like Halle Berry and Michelle Williams have rocked the blunt cut and asymmetrical bobs respectively, proving that this style can be tailored to suit any face shape or personal taste. To style your bob for optimal camera appeal, try adding some subtle layers around the jawline to create movement and texture – it will add depth to your look without overpowering your features.
Undercuts and Fade Designs: Adding Edge to Short Hair
When it comes to short hair, undercuts and fade designs can instantly elevate your look and add visual interest to your photos. An undercut involves cutting the hair on the sides and back very short, while leaving the top longer. This style is a great way to create contrast and make your face shape more defined.
Fade designs take this concept further by blending the cut with a gradual decrease in length, creating a seamless transition from the undercut area to the rest of the head. For example, a “high fade” can add an edgy touch to a short hair style, while a “skinny fade” creates a sleek and modern look.
To incorporate these styles into your photos, try experimenting with different angles and lighting setups. A slight tilt of the head or a strategically-placed flash can accentuate the undercut or fade design, making it the focal point of the photo. Consider playing around with bold colors or graphic patterns to add even more visual interest to your look. By incorporating undercuts and fade designs into your short hair style, you’ll be able to create photos that are both stylish and visually striking.
Composition Techniques for Captivating Short Hair Photos
Mastering composition techniques is crucial when it comes to showcasing short hair, and I’m excited to share some expert tips that will elevate your photos to the next level.
The Rule of Thirds: Placing the Subject in Perfect Harmony
When composing short hair photos, it’s essential to balance the subject’s face and hair in a way that creates harmony. One powerful technique for achieving this is by applying the rule of thirds. This principle involves dividing the image into nine equal parts, using two horizontal lines and two vertical lines. The idea is to place the subject’s face or most interesting features along one of these lines or at their intersections.
By placing the subject off-center, you create a more dynamic composition that draws the viewer’s eye towards the subject. For example, if your model has striking eyes, consider positioning them on either side of the vertical line, rather than directly in the center. This will add visual interest and create a sense of depth in the image.
Remember, the rule of thirds is not set in stone – feel free to experiment with different compositions that suit your vision. But as a starting point, it’s an excellent guide for creating balanced and captivating short hair photos that showcase the subject’s unique features.
Leading Lines: Using Negative Space to Enhance Short Hair
When it comes to showcasing short hair in photos, using composition techniques like leading lines and negative space can elevate the visual appeal of your images. One way to do this is by incorporating negative space around the subject’s head or hair. This creates a sense of simplicity and elegance, allowing the viewer’s eye to focus on the texture and style of the short hair.
To create effective use of negative space in your photos, experiment with different backgrounds and environments. A plain colored wall or a minimalist setting can provide a clean canvas for showcasing the subject’s hair. Alternatively, you could incorporate natural textures like wood or stone to add depth and interest to the image.
When using leading lines to enhance short hair, look for visual elements that can guide the viewer’s eye to the subject’s face or hair. This might be a line of fabric, a railing, or even a subtle shadow on the wall. By incorporating these lines into your composition, you can create a sense of movement and draw attention to the subject’s hairstyle.
Experimenting with Angles and Perspectives
When it comes to capturing captivating short hair photos, experimenting with angles and perspectives is essential for adding depth and interest. A straightforward approach often results in cookie-cutter images that fail to showcase the beauty of the haircut.
One effective way to add uniqueness to your short hair photos is by experimenting with unique angles. Instead of shooting directly from the front or side, try capturing your subject from above or below. This not only adds depth but also creates a sense of drama and flair. For example, shoot from slightly above to emphasize the layers and texture of the haircut.
Another approach is to play around with perspectives. Try using wide-angle lenses to create a sense of vastness, or experiment with macro photography to highlight the intricate details of the hairstyle. Don’t be afraid to get creative – shoot from within an inch of your subject’s face or try capturing the hair from behind. The possibilities are endless, and experimenting with angles and perspectives can help you develop your unique visual style.
Experimenting with unusual vantage points can also help draw attention away from any imperfections in the haircut, creating a more polished final image.
Post-Processing Tips for Enhancing Short Hair Photos
When editing short hair photos, a few key adjustments can make all the difference in enhancing their natural texture and movement. Let’s explore some post-processing tips to help you achieve stunning results.
Adjusting Lighting and Contrast: Bringing Out the Best in Short Hair
When it comes to showcasing short hair, getting the lighting and contrast just right is crucial. Too little light can make the hair appear dull, while too much can wash out the details. So, how do you achieve that perfect balance? Start by adjusting the brightness of your image. If the hair looks washed out or lacks depth, try increasing the brightness to around 50-60%. However, be cautious not to overdo it – too much brightness can create an unnatural sheen.
To bring out the texture and detail in short hair, work on balancing the contrast. A good rule of thumb is to aim for a mid-tone gray value, around 18-20% on the histogram. This will help maintain the natural shine and vibrancy of the hair. Experiment with adjusting the contrast slider while keeping an eye on the shadows – if they become too dark or lost, you can recover some detail by increasing the contrast.
When enhancing short hair photos, pay attention to areas like the temples and edges, where the light naturally falls more harshly. Soften these areas slightly using a local adjustment tool or by reducing the brightness in specific zones. By finding this sweet spot between brightness and contrast, you’ll be able to showcase your client’s short style in all its glory – with depth, texture, and that perfect bounce of shine.
Removing Blemishes and Imperfections: The Art of Retouching
Removing blemishes and imperfections from short hair photos is an essential step in post-processing that can make all the difference in the final result. When it comes to retouching, the goal is not to create a perfect image but to enhance the natural beauty of the subject while subtly removing any unwanted distractions.
To remove blemishes and imperfections effectively, start by zooming in on specific areas of the face or hair where you want to make adjustments. Use the clone stamp tool or healing brush to carefully cover up small blemishes or scars, making sure to match the texture and tone of the surrounding area as closely as possible.
Be cautious not to over-process, as this can lead to an unnatural look that detracts from the overall image. Remember, less is often more when it comes to retouching – aim for a subtle enhancement rather than a drastic change. Use adjustment layers or local adjustments to make targeted tweaks to areas such as skin tone, brightness, and contrast. By doing so, you can achieve a polished finish that flatters your subject without appearing overly Photoshopped.
Color Grading and Enhancement: Adding Pop to Short Hair Photos
When it comes to short hair photos, color grading and enhancement can make all the difference between an average shot and a show-stopping one. The right colors can add depth, dimension, and visual appeal to even the simplest of hairstyles.
To start, let’s talk about the basics of color grading. Essentially, this is the process of manipulating the colors in your photo to achieve a specific mood or atmosphere. For short hair photos, you’ll want to focus on techniques that enhance and balance the existing tones in the image. Here are a few key tips:
* Desaturate warm tones: If your subject has golden or brassy undertones, try desaturating them slightly to create a more neutral base tone.
* Boost cool tones: On the other hand, if you’re working with an ash-blonde or platinum color, consider boosting the cool tones to bring out the brightness and dimension in the hair.
* Pay attention to contrast: Experiment with adjusting the contrast levels to enhance the texture and definition of the short hair.
By applying these techniques and paying attention to your subject’s natural colors, you can add a level of sophistication and visual interest to even the most straightforward short hair photos.
Common Mistakes to Avoid in Short Hair Photography
When it comes to capturing stunning short hair photos, avoiding common mistakes can make all the difference. In this section, we’ll identify key pitfalls to sidestep for incredible results.
Insufficient Lighting: The Most Common Pitfall
When it comes to capturing stunning images of short hair, one common pitfall that even experienced photographers can fall prey to is insufficient lighting. This mistake can make all the difference between a beautifully lit photo and a poorly lit one.
Insufficient lighting can lead to harsh shadows, unflattering highlights, and an overall lackluster image. To avoid this, it’s essential to choose a well-lit location or invest in proper lighting equipment. Consider using natural light by photographing near a window or outside during the golden hour (the hour just before sunset) when the soft, warm light is ideal for capturing details.
If shooting indoors, ensure that the room is well-lit with a mix of artificial and natural light sources. Avoid relying on harsh overhead lighting, as it can create unflattering shadows on the subject’s face and hair. Instead, use softbox lights or sidelights to create a more flattering and even illumination. Remember, good lighting is key to capturing the beauty and texture of short hair, so take the time to get it right.
When using artificial light sources, experiment with different setups and intensities to achieve the desired effect. Consider using a reflector to bounce light onto areas that are in shadow, such as the underside of the subject’s chin or neck.
Neglecting the Background: The Importance of Context
When it comes to short hair photography, it’s easy to get caught up in capturing the perfect shot of the hairstyle itself. However, neglecting the background can detract from the overall photo and make it seem unpolished. A cluttered or distracting background can take attention away from the star of the show – your subject’s beautiful locks.
Think about it: a well-styled coiffure is only half the battle when it comes to creating a stunning short hair photo. The background sets the tone for the entire image, and a mismatched or uncoordinated backdrop can instantly make the photo look amateurish. To avoid this common mistake, take a few moments to consider the background before snapping the shot.
For example, if you’re shooting in a studio with neutral-colored walls, use a plain colored sheet or tablecloth to create a cohesive look. Avoid busy patterns or bold colors that might compete with the subject’s hairstyle. If shooting on location, scout out a clean and simple backdrop – such as a wall with a minimalist design or a large piece of white fabric draped over a stand. By paying attention to the background, you’ll be able to create a polished and professional-looking short hair photo that showcases your subject’s stunning locks in the best possible light.
Not Editing Wisely: Balancing Enhancement and Authenticity
When it comes to editing short hair photos, it’s easy to get carried away with enhancements that can ultimately compromise the authenticity of the image. Editing wisely requires a delicate balance between enhancing the features and staying true to the natural beauty of the subject.
First and foremost, it’s essential to start with good lighting and composition. A well-lit and well-composed shot provides a solid foundation for editing, allowing you to make subtle enhancements that elevate the image without altering its core essence. As you edit, focus on making adjustments that are true to the subject’s features – rather than imposing your own style or preferences.
For instance, if you’re working with someone who has naturally curly hair, avoid using excessive smoothing tools that can flatten their texture and lose definition. Instead, use subtle tweaks to enhance their natural curl pattern and add depth to the image. Similarly, when enhancing facial features, aim for a more refined look rather than over-contouring or heavy-handed enhancements that can look unnatural.
Ultimately, editing wisely means finding that sweet spot where enhancement meets authenticity – allowing the subject’s unique characteristics to shine through while still presenting a polished, high-end aesthetic.
Frequently Asked Questions
What if I’m not a professional photographer or stylist? Can I still take great short hair photos?
You don’t need to be an expert to capture stunning short hair photos. With the right techniques and equipment, you can produce high-quality images. Pay attention to lighting, composition, and styling tips mentioned in this article, and practice makes perfect.
How do I ensure my subject’s facial features are accentuated without overdoing it?
Accentuating facial features is key in short hair photography. Experiment with different angles and perspectives to find the most flattering view of your subject’s face. Also, pay attention to lighting techniques that can help minimize imperfections while highlighting key features.
Can I use a standard studio backdrop or should I opt for something more creative?
While a standard studio backdrop can work well for short hair photography, it’s not necessary to stick with it. Consider using unique backdrops or even incorporating the environment into your photos for added context and interest. Just remember to balance the subject with the background.
How do I prevent over-editing my short hair photos without losing their authenticity?
When editing your short hair photos, strike a balance between enhancement and authenticity. Focus on adjusting lighting and contrast, color grading, and removing blemishes and imperfections judiciously. Remember that sometimes, less is more – it’s better to enhance rather than alter the image too much.
Can I use the same techniques for long hair photography as well?
While some techniques can be applied to both short and long hair photography, there are key differences between the two. Short hair photography often focuses on clean lines, texture, and facial features, whereas long hair photography might emphasize movement, flow, and styling. Experiment with different approaches to find what works best for your subject’s unique style and features.